Self managed, highly available kubernetes cluster on AWS using kubeadm
Kubeadm is a tool to bootstrap Kubernetes clusters. It performs necessary actions to get a minimum viable cluster up and running.
In this post, I have explained how to create a highly available Kubernetes cluster on AWS using Kubeadm.
Prerequisites
- AWS Account
- Good knowledge of AWS, Kubernetes, Terraform
- Tools required on your local machine/laptop
- AWS CLI (to interact with AWS account, configure the AWS CLI with security credentials and a named profile.)
- Packer (to create AWS AMI for Kubernetes master and worker EC2 instances)
- Terraform (to create the infrastructure on AWS)
- kubectl (to interact with Kubernetes cluster)
- helm (to deploy a sample application to Kubernetes cluster)
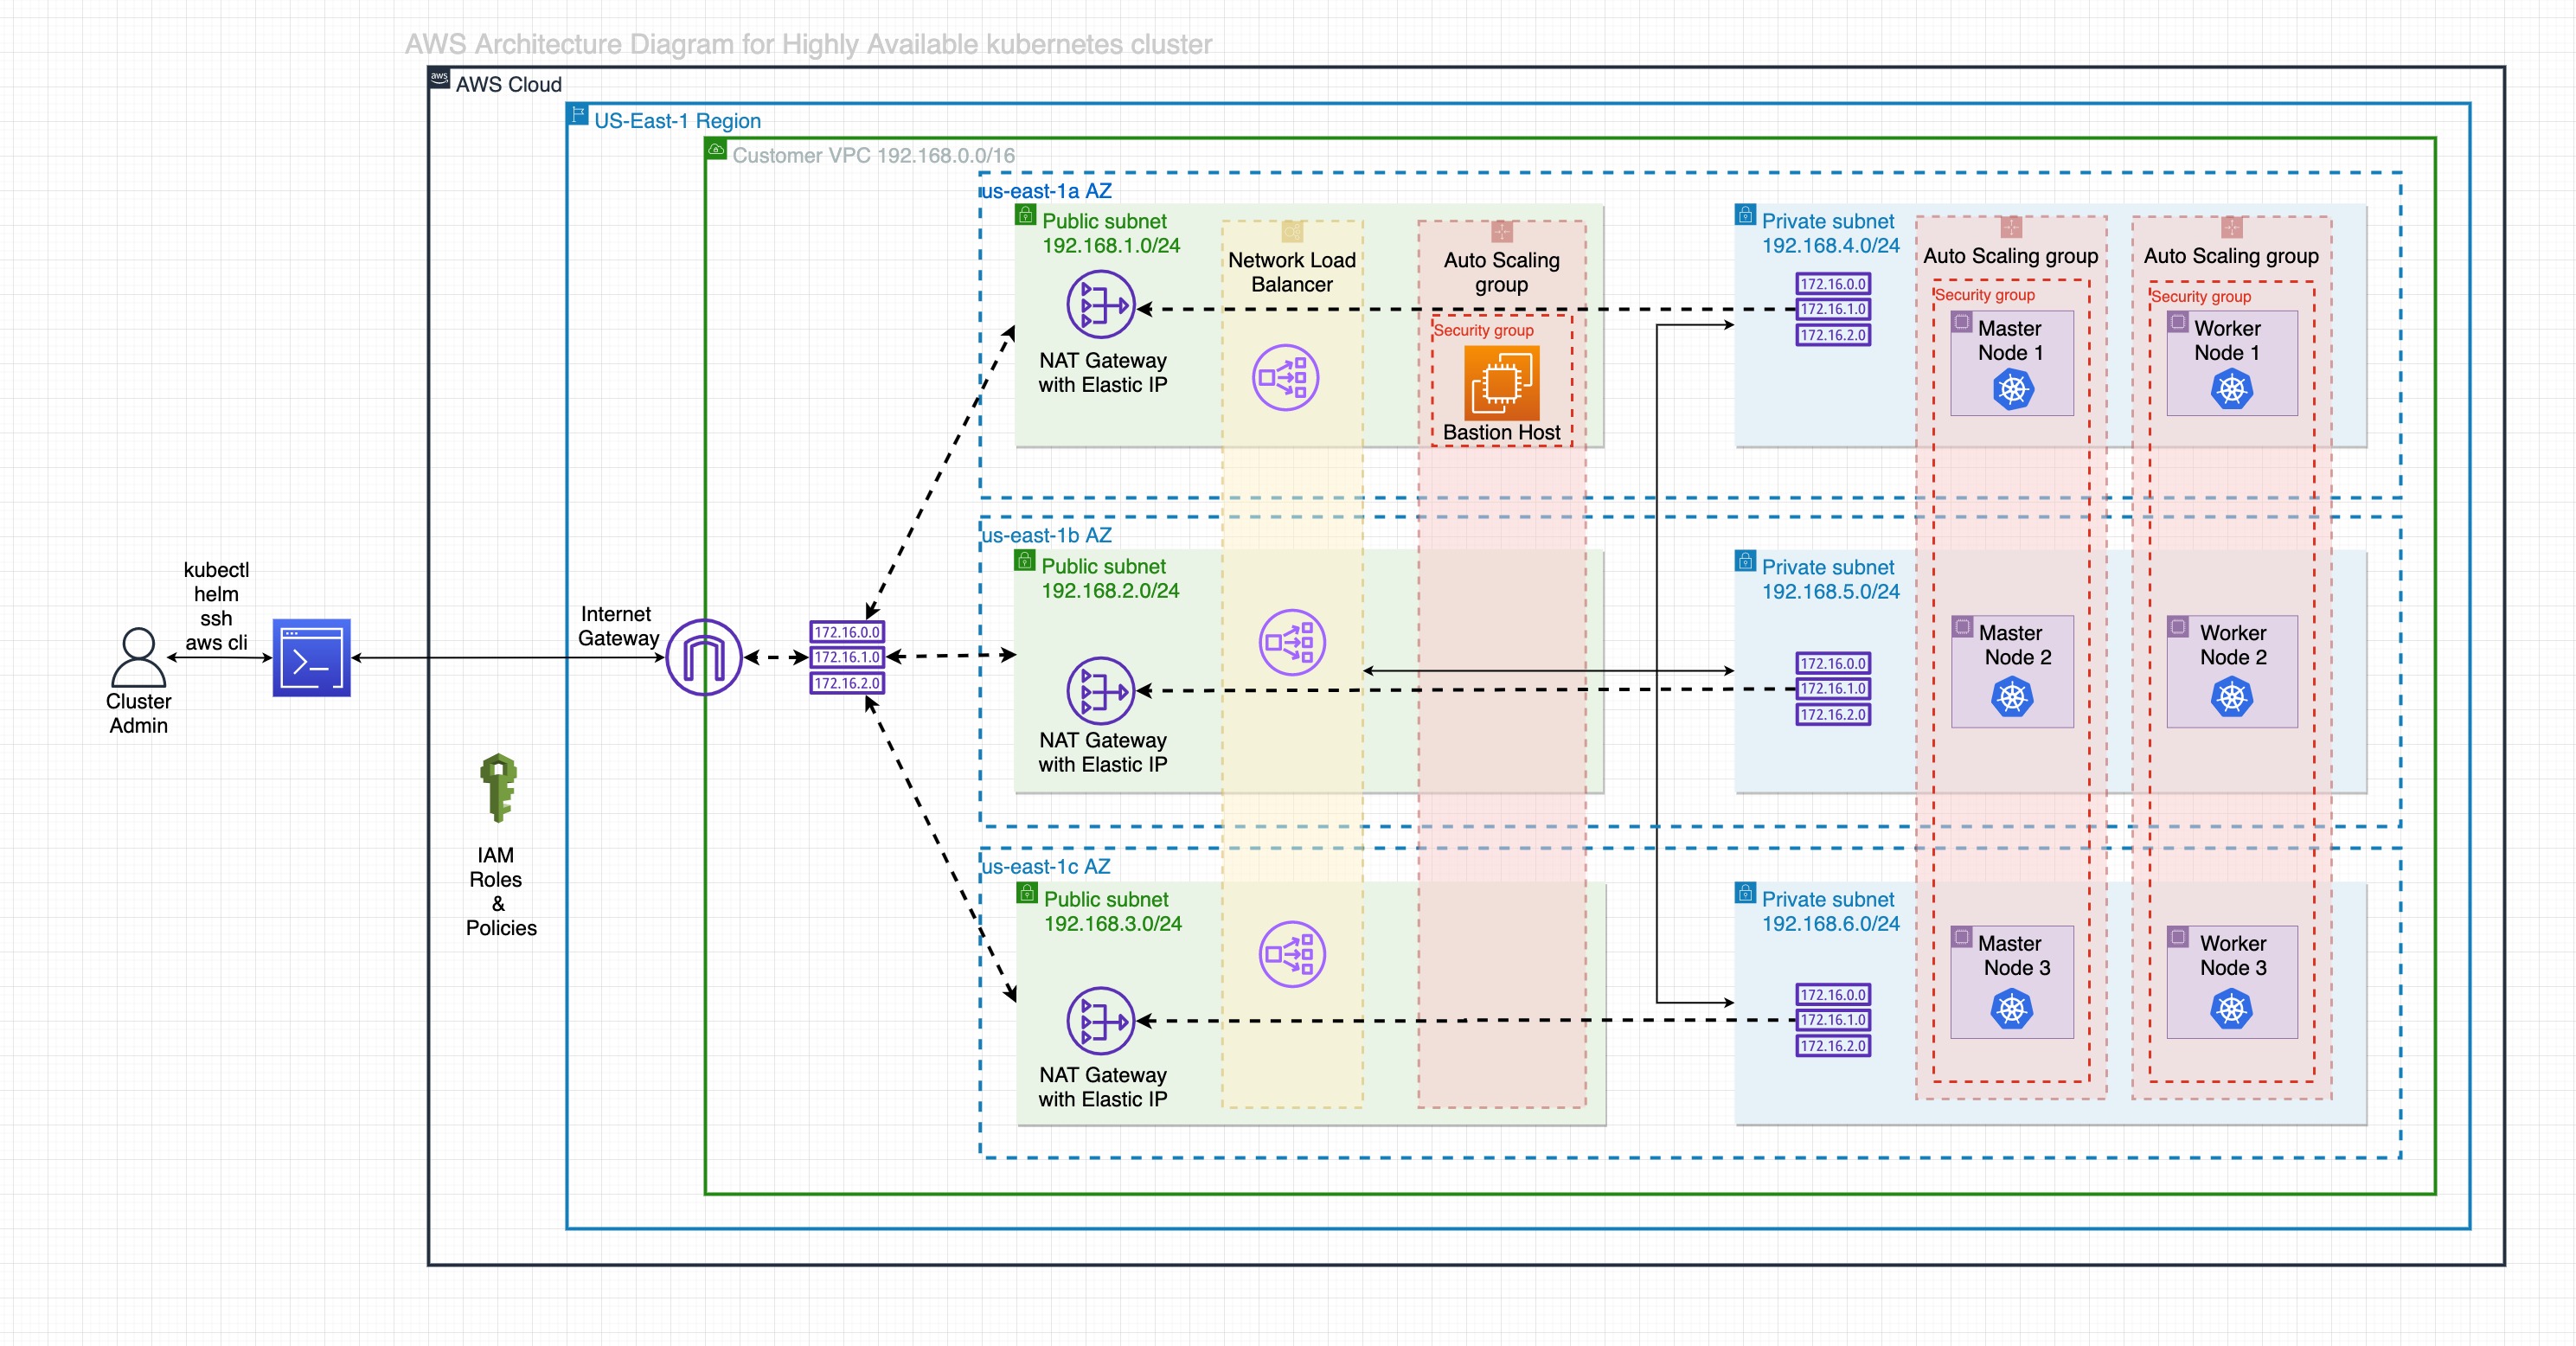
AWS Infrastructure overview
We will create the following AWS resources using terraform.
- AWS VPC (with 3 public and 3 private subnets, route tables, nat gateway, internet gateway)
- Security groups, Autoscaling groups for bastion host(min. 1 instance), master nodes(min. 2 instances), worker nodes(min. 1 instance).
- AWS NLB to communicate with all control plane nodes (master) on api server port 6443 from kubectl utility. Worker nodes will also communicate with the control plane through the same AWS NLB.
- IAM roles and policies for master and worker nodes.
Refer to the above diagram for a better understanding of AWS architecture.
I have used us-east-1 region with 3 availability zones (us-east-1a, us-east-1b, us-east-1c) to setup the cluster.
To prevent direct attacks on the cluster and the application, both master and worker nodes will be created in private subnets so that the instances can never be reached from the internet.
Master and worker nodes can reach the internet using NAT Gateway.
Each node should have at least 2 CPU/vCPU cores, 2GB RAM, and 10GB disk space, so I have used t2-medium instances for both master and worker nodes.
All the AWS resources required by kubernetes cluster have a tag with key "kubernetes.io/cluster/<cluster-name>". Kubernetes itself will also use this tag on things that it creates, and it will use a value of “owned”. This value does not need to be used on resources that Kubernetes itself did not create.
Master Node Security Group Inbound Rules:
| Port range | Source | Description |
|---|---|---|
| 22 | Bastion Host SG | allows bastion host to ssh into master nodes. |
| 6443 | 0.0.0.0/0 | allows NLB to reach the api server on port 6443. As we are using NLB with target type as instance-id so the client IP of incoming traffic is preserved due to this the target instances will see the actual Client IP address as the source address, hence the source value is 0.0.0.0/0. |
| 2379-2380 | Master node SG | etcd server is accessible on these ports. |
| 10259 | Master node SG | kube-scheduler is accessible on port 10259 port. |
| 10257 | Master node SG | kube-controller-manager is accessible on port 10257 port. |
| 10250 | Master node SG | kubelet is accessible on port 10250 port. |
Master Node Security Group Outbound Rules:
| Port range | Destination | Description |
|---|---|---|
| 80 | 0.0.0.0/0 | allows master nodes to reach internet on port 80 (HTTP). |
| 443 | 0.0.0.0/0 | allows master nodes to reach internet on port 443 (HTTPS). |
| 6443 | 0.0.0.0/0 | allows master nodes to reach control plane via NLB. |
| 10250 | VPC CIDR | allows kube api server to reach kubelet. |
| All | VPC CIDR | allows communication between different control plane components. Ideally, the destination should be the security group id of the master node but since terraform doesn’t support destination as another security group so I added CIDR range of VPC. |
Worker Node Security Group Inbound Rules:
| Port range | Source | Description |
|---|---|---|
| 22 | Bastion Host SG | allows bastion host to ssh into master nodes. |
| 10250 | Master node SG | allows api server to access kubelet on port 10250. |
| All | Worker node SG | allows communication between worker nodes on all protocols. |
Worker Node Security Group Outbound Rules:
| Port range | Destination | Description |
|---|---|---|
| 80 | 0.0.0.0/0 | allows worker nodes to reach internet on port 80 (HTTP). |
| 443 | 0.0.0.0/0 | allows worker nodes to reach internet on port 443 (HTTPS). |
| 6443 | 0.0.0.0/0 | allows worker nodes to reach control plane via NLB. |
| All | VPC CIDR | allows communication between worker nodes on all protocol. |
Build base image
To create a cluster using kubedm, we need to install kubectl, kubeadm, kubelet, docker, disable swap, configure iptables, etc on each EC2 instance. Click here to learn more.
Since we will be deploying multiple nodes in the cluster, installing these tools manually on each one would not be feasible. Packer will be used to resolve this problem.
Packer is a tool used to create AMIs. It takes a base image (in our case Ubuntu-bionic-18.04), installs all the dependencies, and creates a new image which contains the packages and configurations required to run the Kubernetes cluster.
By using a pre-baked image, you can drastically reduce the time it takes to scale up the nodes.
To keep things simple we will use the same AMI for both master and worker nodes.
The packer tool takes a json template file with a series of declarations and commands for it to follow. The template tells Packer what plugins(builders, provisioners) to use, how to configure the plugins, and in what order to run them.
Open a command prompt or terminal, clone the git repo and navigate to the packer directory. It has a json template(“k8sami.json”) and a shell script(commands to install required packages and configure AMI). Modify variables and other parameters in json template if required.
I have used a shell provisioner in json template which will execute the shell script to configure the instance into the desired state.
Run the below command on the local machine. It will take around 30-40 minutes to create the AMI.
1 | AWS_PROFILE=<profilename> packer build k8sami.json |
Provision Infrastructure
Follow the below steps to execute the terraform scripts:
Step 1 - Create a S3 bucket to store the terraform state. Assign the bucket name to backend config in “config.tf” file.
Step 2 - Create an EC2 key pair either through AWS console or CLI and assign it to cluster.k8s_ssh_key_name variable in terraform.tfvars file. This key pair would be required to ssh into the bastion, master, and worker nodes.
Step 3 - Set the value of ami variable to the newly created ami name, aws_account_no to the AWS account number in terraform.tfvars file, modify other variables(For eg:- cluster_name, region, vpc_cidr, etc) as required.
Step 4 - Navigate to terraform directory, and run the below command to initialize terraform working directory.
1 | AWS_PROFILE=<profilename> terraform init |
Step 5 - Run the below command to preview the changes that terraform will make to infrastructure.
1 | AWS_PROFILE=<profilename> terraform plan |
Step 6 - To create the infrastructure for the Kubernetes cluster run terraform scripts using the below command
1 | AWS_PROFILE=<profilename> terraform apply |
Step 7 (optional) - To delete the infrastructure run the below command
1 | AWS_PROFILE=<profilename> terraform destroy |
After the Terraform scripts are executed successfully, we can start with the cluster set up.
Bootstrap control plane
We will use below kubeadm configuration to initialize the control plane.
In order for the kubernetes cluster to function properly, the API server, controller manager, and every kubelet on master/worker node must have the flag “cloud-provider: aws”. It has been passed as extraArgs in the configuration.
1 | apiVersion: kubeadm.k8s.io/v1beta2 |
SSH into one of the master node via bastion host, create a file with above configuration, set the value of clusterName(use same cluster name which was used in terraform scripts), assign <NLB url:6443> to controlPlaneEndpoint, VPC CIDR to podSubnet and save the file with name “cluster-config.yaml”.
Run the below command to initialize the Kubernetes cluster.
1 | sudo kubeadm init --config cluster-config.yaml --upload-certs |
During kubeadm init, kubeadm uploads the ClusterConfiguration object to your cluster in a ConfigMap called kubeadm-config in the kube-system namespace. This configuration is then read during kubeadm join, kubeadm reset and kubeadm upgrade.
If the kubeadm init command is executed successfully, it will print the below message about how to add additional master(control plane) nodes and worker(data plane) nodes.
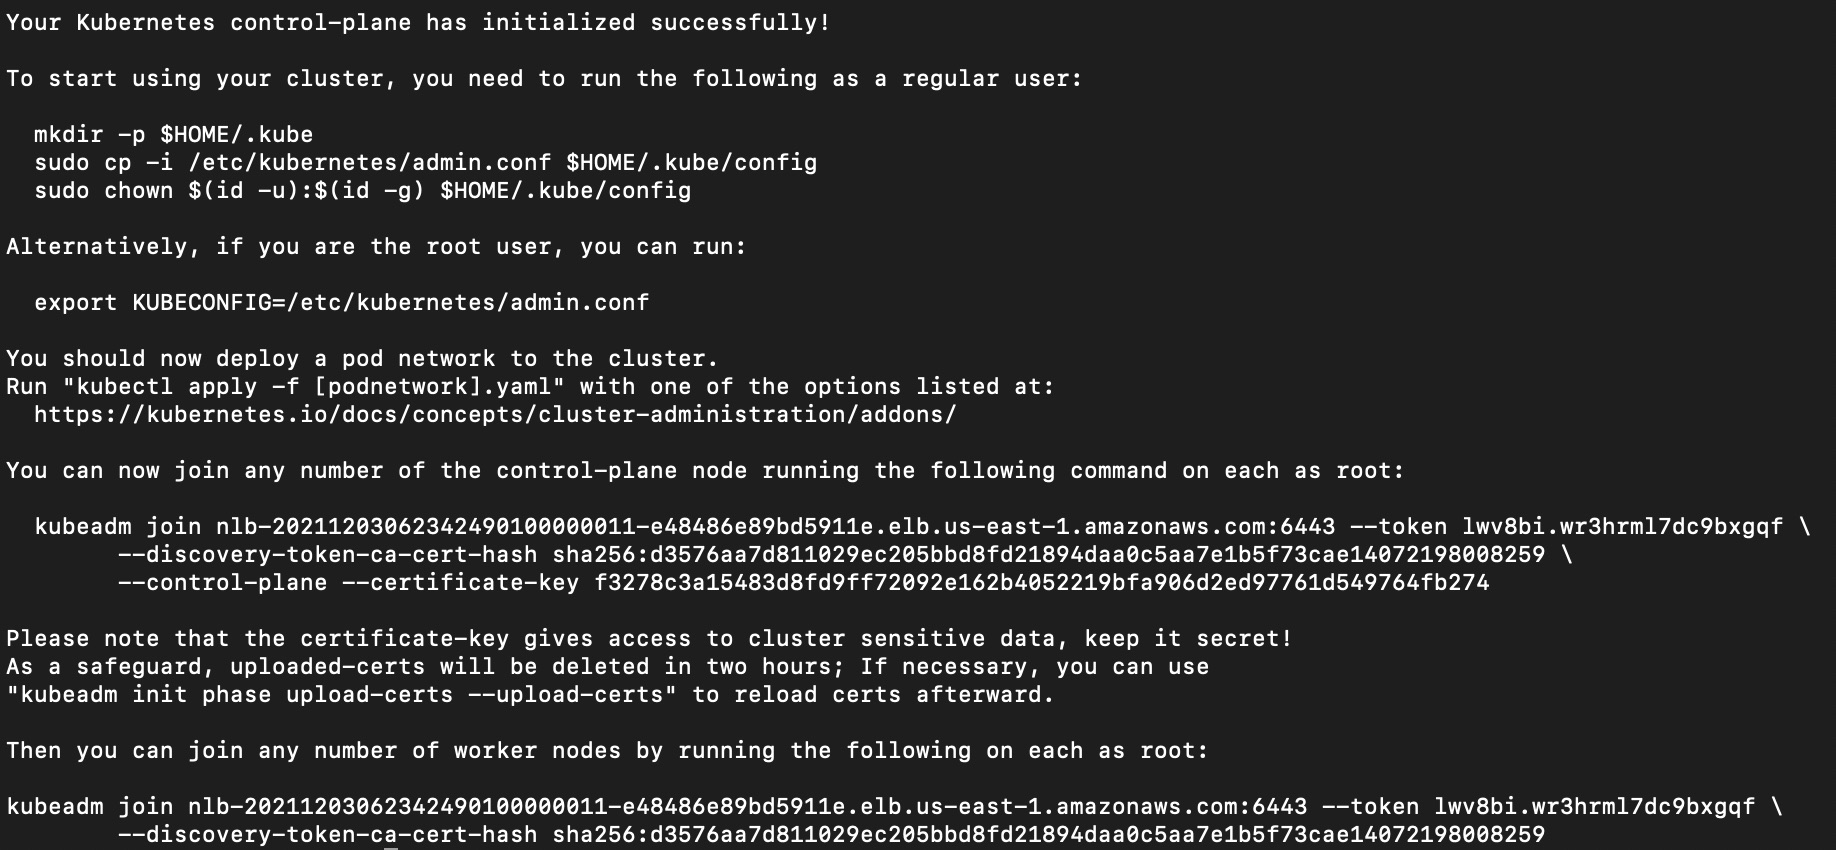
To make kubectl command work for your non-root user, run these commands, which are also part of the kubeadm init output:
1 | mkdir -p $HOME/.kube |
If the kubeadm init command fails, you can debug the errors using the below command on master nodes.
1 | journalctl -a -xeu kubelet -f |
To delete all the configurations that kubeadm has done so that you can start your configuration from scratch again, run the below command.
1 | kubeadm reset |
To join other master nodes we will use following configuration:
1 | apiVersion: kubeadm.k8s.io/v1beta2 |
SSH into other master node and create a file “master-join-config.yaml” with above configuration.
We will use the same values for token, caCertHashes & certificateKey from “kubeadm join” command which was printed as output of “kubeadm init” command.
Set the value of controlPlane.localAPIEndpoint.advertiseAddress to ip address of the master node, apiServerEndpoint to <NLB url:6443>, and nodeRegistration.name to hostname of the instance(EC2 private dns entry of the instance).
Run the below command to join the master node to the cluster:
1 | sudo kubeadm join --config master-join-config.yaml |
When the above command is executed successfully, it will print the following message.
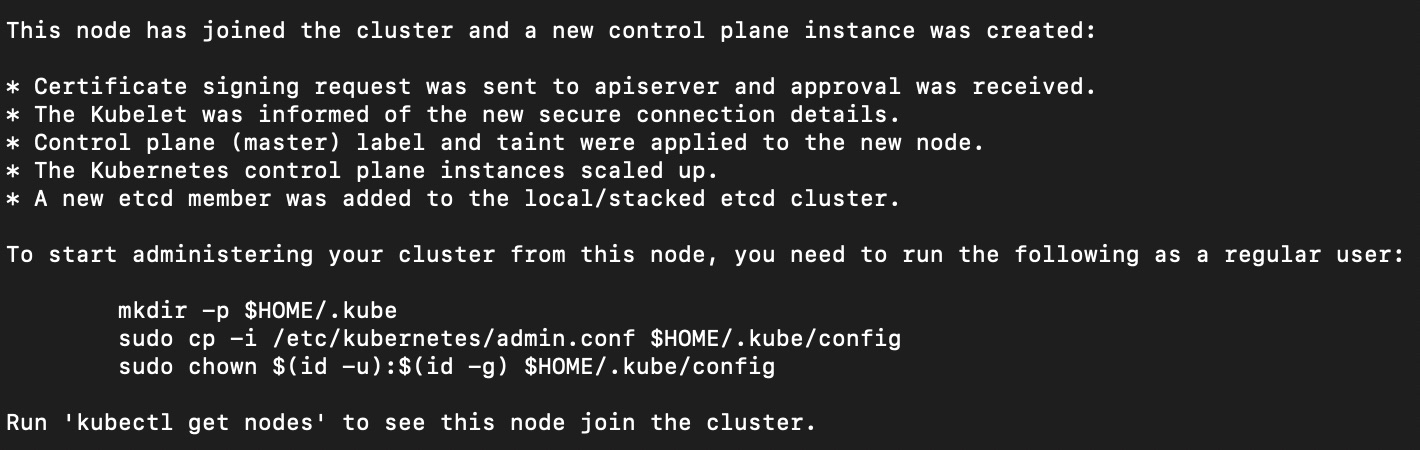
If you run kubectl get nodes command on master node you would find that the node status is “not ready”.
To fix this we need to install CNI (Container Network Interface) in the cluster.
Configure CNI
Kubernetes cluster uses some overlay network inside for the pods and other services so we need to deploy a pod network so that Kubernetes resources can communicate with each other internally.
I have used weave-net pod network for the cluster. It can be installed using a single yaml configuration file which can be downloaded from here or you can use the same yaml file “weave-daemonset-k8s-1.11.yaml” which I have used. It is in the CNI directory of the cloned repo on your local machine, copy that file to master node and run the below command.
1 | kubectl apply -f weave-daemonset-k8s-1.11.yaml |
Run kubectl get nodes command again and this time you would see the status of nodes as ready.
Bootstrap worker nodes
SSH into worker node and create a file “worker-join-config.yaml” with below configuration.
1 | apiVersion: kubeadm.k8s.io/v1beta2 |
Set the values of token, apiServerEndpoint, caCertHashes, nodeRegistration.name in the same way as we did for master node to join the cluster in the previous section.
Run the below command to add worker nodes in the cluster.
1 | sudo kubeadm join --config worker-join-config.yaml |
The following message will be printed after the command is successfully run.

Configure remote cluster control
So far we have run all the commands from master and worker nodes, but this is good only for the first time when we configure the cluster. We should be able to access the cluster from the laptop also.
To access the cluster from your local machine, follow these steps:
- Login into the master node and copy the “/etc/kubernetes/admin.conf” file to your local machine.
- Install kubectl command line tool on your machine.
- By default, kubectl looks for a file named “config” in the “$HOME/.kube” directory. This is the KUBECONFIG file and it is used to store information about your connection to the Kubernetes cluster.
When you use kubectl to execute commands, it gets the correct communication information from this KUBECONFIG file, so create a .kube directory in the home directory (“$HOME/.kube”) on your machine. - Move the “admin.conf” file to .kube directory and change the name of that file to “config”.
After that, run the below command to test if you can access the cluster from your local machine, and it should print the number of nodes in the cluster.
1 | kubectl get nodes |
Alternatively, you can also specify other kubeconfig files by setting “–kubeconfig” flag with kubectl commands.
1 | kubectl get nodes --kubeconfig admin.conf |
Auto join worker nodes
If you scale up the worker nodes, you have to run the “kubeadm join …” command manually every time which isn’t very convenient.
I have automated this process using a script (“worker-userdata.sh.tpl”) which is passed as user-data to worker node’s launch configuration during terraform script execution.
Whenever a new worker node is launched, the script gets executed and the node automatically joins the cluster. Please note that it only works when the control plane is already bootstrapped.
This script uses AWS CLI and AWS System Manager run command to execute commands remotely on a control plane node.
Steps performed by the script:
- Generates a token on master node using AWS SSM.
1 | kubeadm token generate |
- Generates a join command on master node. This is required to update the kubeadm configmap with the new generated token.
1 | kubeadm token create <token> --print-join-command |
- Fetches controlplane endpoint from master node using AWS SSM.
1 | kubectl -n kube-system get cm kubeadm-config --kubeconfig /home/ubuntu/.kube/config -o yaml | grep controlPlaneEndpoint |
- Calculates the CA Certificate Hash for Kubeadm on master node using AWS SSM.
1 | openssl x509 -in /etc/kubernetes/pki/ca.crt -pubkey -noout | |
- Gets the FQDN (hostname) of worker node.
1 | curl -s http://169.254.169.254/latest/meta-data/local-hostname |
- Creates a config file with all the information fetched in the previous steps on the worker node.
1 | cat <<EOF > /home/ubuntu/worker-join-config.yaml |
- Executes the kubeadm join command with config file on the worker node.
1 | kubeadm join --config /home/ubuntu/worker-join-config.yaml |
- Delete the generated token
1 | kubeadm token delete <token> |
To test the auto-join functionality, manually scale up the worker nodes using AWS Autoscaling Group.
It might take a few minutes for the worker node to join the cluster, run the below command from your local machine to check if the new worker node has already joined the cluster.
1 | kubectl get nodes |
In case if worker node couldn’t join the cluster, login into the worker node and run the below command to check the logs for any errors that might have occurred during user-data script execution.
1 | cat /var/log/cloud-init-output.log |
Deploy sample app
To test if everything is working fine, we can deploy a sample application.
Use the below command to deploy the nginx web server from your local machine.
1 | helm install mywebserver bitnami/nginx |
To verify if pod object was successfully deployed, we can run the following command:
1 | kubectl get pods -l app.kubernetes.io/name=nginx |
To get the complete URL of this service, run:
1 | kubectl get service mywebserver-nginx -o wide |
Copy the value for EXTERNAL-IP, open a new tab in your web browser, and paste it in, you should see a welcome message, similar to:
Test high availability
As a part of the high availability test, we will simulate master node failure by scaling it down to one instance using AWS Autoscaling Group.
After that, we can run the below command from the local machine to test if the Kubernetes cluster is still accessible.
1 | kubectl get po |
If the command is executed successfully, it means that the cluster is still accessible and you can create more pods, deployment, services etc.
Regenerate join commands
If you loose the join commands which were printed after initializing the control plane using “kubeadm init” command then you can regenerate those commands.
SSH into already working master node and run the below commands:
To print the join command:
1 | kubeadm token create --print-join-command |
To generate a new certificate key, re upload certs in the master node:
1 | sudo kubeadm init phase upload-certs --upload-certs --config cluster-config.yaml |
You can then join the master and worker nodes using the same steps described in the previous sections.
Please let me know if you have any questions or comments.